|
3.6.1. Route Planning and Adherence
|
 
|
|
3.6.1. Route Planning and Adherence
|
|
3.6.1 Route Planning and Adherence
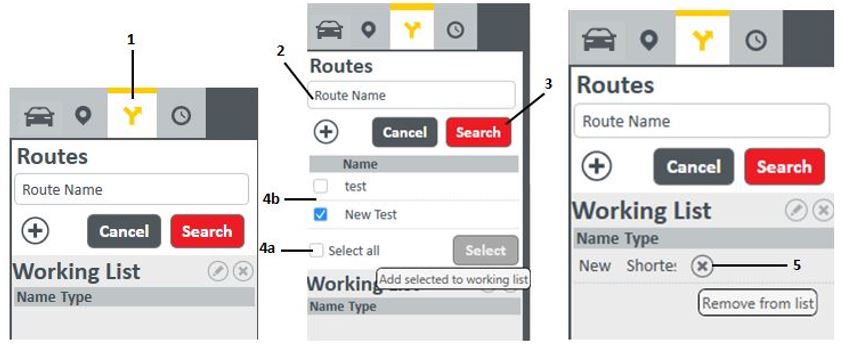
The icons below provide access to the following functions:

|
|
Search : 1. "Click" the Routes tab to open the Routes side bar. 2. Enter the Route Name into the field. 3. Activate the Search icon. Empower will perform a search and retrieve the Route information from the Tracker database and display it. 4. The user has two options to transfer the Route to the Working List: a. A Select All tick-box selects all the available or, b. Individual Routes can be picked from the list by "ticking" the relevant box next to the Route Name. 5. After the selection, the user activates the Add selected to working list icon. Only the selected Routes will be transferred to the Working List. 6. To delete an Route from the Working List, move the mouse pointer over the delete icon. You will be prompted with Remove Route from list. "Click to remove the Route. |
|
|
|
|
|
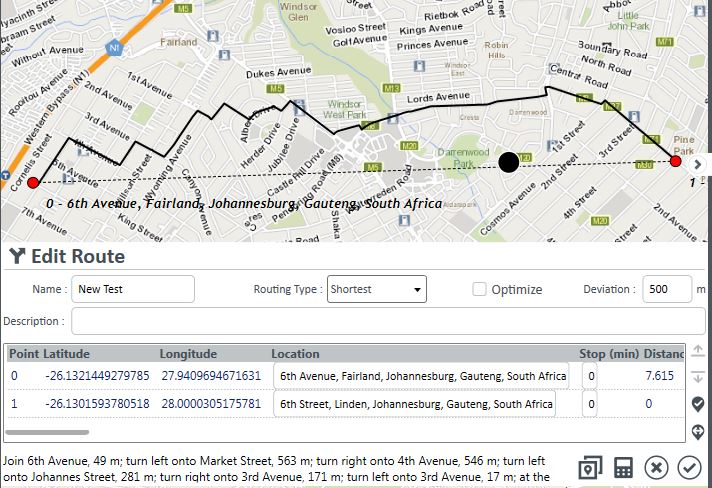
Create New Route : This icon allows the user to create a new route. When selecting to
add a new route, click the Add New Route
Button. The route detail form will be displayed at the bottom
of the map. Enter
a Route Name and Route Type. You will also be able to edit the Route
deviation distance. You
should now be able to add a new waypoint to the route by right clicking
on the map. A popup will apear with the option to
add a waypoint as a start or finish button. You can now add the new
waypoint at the beginning of your route. |
|
|
|
|
|
Edit Route: When selecting the route in the working list you will be able to edit the route. When clicking edit button he same Edit Route form will be displayed as in the add route above. The following functions will
be available. 1. Change the name, 2. change the routing type between fastest or shortest, 3. update the Deviation distance in meters, 4. change the order of the waypoints 5. Complete the route (add start waypoint at end) 6. Reverse the route 7. Copy the route 8. Calculate the route (this will update the route based on the routing instructions) 9. Save the route 10. Cancel the edit mode.
|
|
|
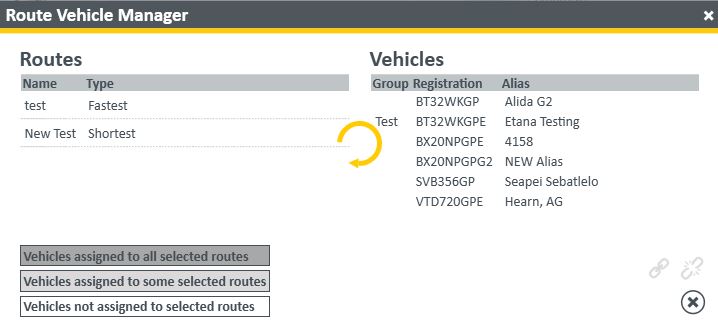
Route Vehicle Manager:
When the Route Vehicle Tool button is selected, a popup box will display where you will be able to manage routes to vehicles.
All created routes and vehicles for this user will be displayed.
When selecting a Route or Routes in this list, the Vehicle list on the right will update with a background colour.
Green - If the vehicle is linked to all the routes selected
Yellow - If the vehicle is only linked to some of the routes.
Transparent - If the vehicle is not linked to any of the routes.
Based on the selected Routes and Vehicles, the Link and Unlink icons will be available. You will be able to Link or Unlink vehicles to Routes. You will also be able to Delete routes to selected vehicles.
|
|
|
|