|
3.7.1 Working Time Icons
|
 
|
|
3.7.1 Working Time Icons
|
|
"Click" the Working Time tab to gain access to the side bar with the
following functions:
|
Icon |
Steps |
|
|
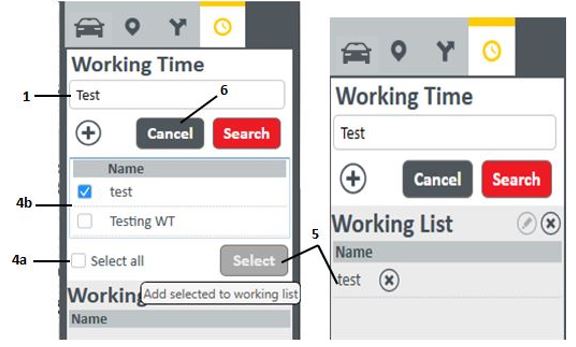
Search for working times containing search criteria: 1. Enter a previously registered Working Time reference into the field. 2. "Click" the Search for working times containing search criteria icon. 3. Empower will perform a search and retrieve the information from the Tracker database and display the results in the section below Search. 4. The user has two options to transfer the information to the Working List. a. "Clicking" on Select All tick-box selects all working times on the list, or b. Individual working times can be picked from the list by "ticking" the relevant box next to the Name. 5. After the selection, the user activates the Add selected to working list icon. Only the selected working times will be transferred to the Working List. 6. Clear search field: Activating this icon, clears the information entered in the Working Time search field.
|
|
|
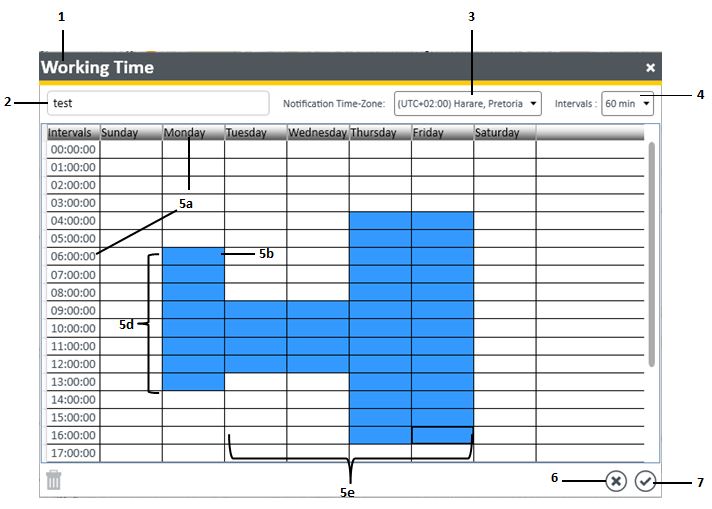
Create new Working Time: 1. Select the Create new Working Time icon. The Working Time window opens. 2. Enter the Name allocated to the working time in the field. 3. Select the applicable Time Zone 4. The working time Intervals (30 minute or 60 minutes) can be selected from the drop-down box. 5. Working times can now be entered by: a. Decide which days and hours the work needs to be performed. (e.g. Monday) b. Place the mouse pointer on the starting time of a day and left "click" the mouse button. Hold the button. c. Gradually drag the pointer downwards till the pointer reaches the end time. Release the mouse button. (It takes a while to highlight the area). d. The "start" and "end" time is highlighted for the specific day. e. Continue with the remaining days of the week. (Tuesday to Friday) 6. To exit the Working Time window without saving, "click" the Close button. 7. To register the working times, "click" the Save Settings button. The registration of the working time takes a few seconds.
|
|
|
|
|
|
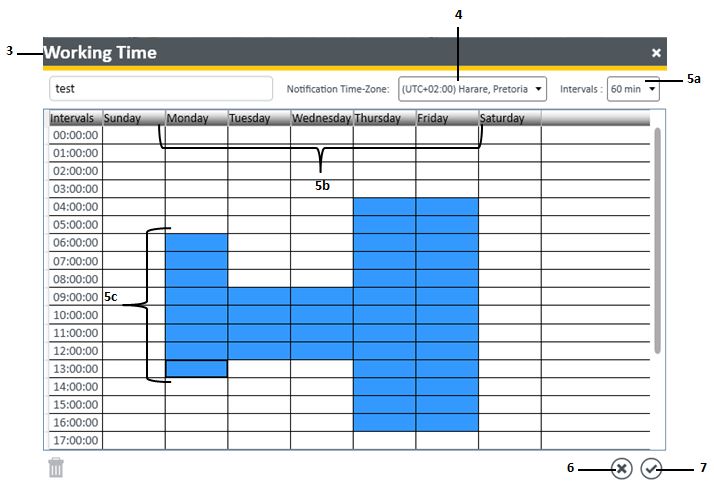
Edit Selected Working Time: 1. Search for the Working Time that needs to be edited. Transfer the working time to the Working List. 2. Select the working time from the Working List. 3. "Click" the Edit Selected Working Time icon at the bottom of the sidebar. The Working Time window opens. 4. Select the applicable Time Zone. 5. The working times can be edited by: a. Changing the settings of the working Intervals (30min or 60 min) b. Deciding which days and hours the work needs to be edited (increase/decrease). c. Placing the mouse pointer on the time of a day which needs to be changed. Left "click" the mouse button. Hold the button. i. To increase the working time: Gradually drag the pointer to extend the working hours till the pointer reaches the required extended time. Release the mouse button. ii. To decrease the working time. Gradually drag the pointer to shorten the working hours. Release the mouse button. d. The update process takes a few seconds. 6. To exit the Working Time window without saving, "click" the Close button. 7. To register the new working times, "click" the Save Settings button. The registration of the working time takes a few seconds.
|
|
|
|
|
|
Delete selected Working Time: 1. Select a working time from the Working List. 2. "Click" the Delete selected Working Time icon of the sidebar. 3. You have to Save the deletion of a working time to register the change. |
|
|
Remove all Working Times from list (bottom of Working List) Activating this icon, clears all the working times in the Working List. |