|
3.5.1 Area Icons
|
 
|
|
3.5.1 Area Icons
|
|
The icons below provide access to the following functions:
![]()
|
Icon Symbol |
Purpose |
||
|
|
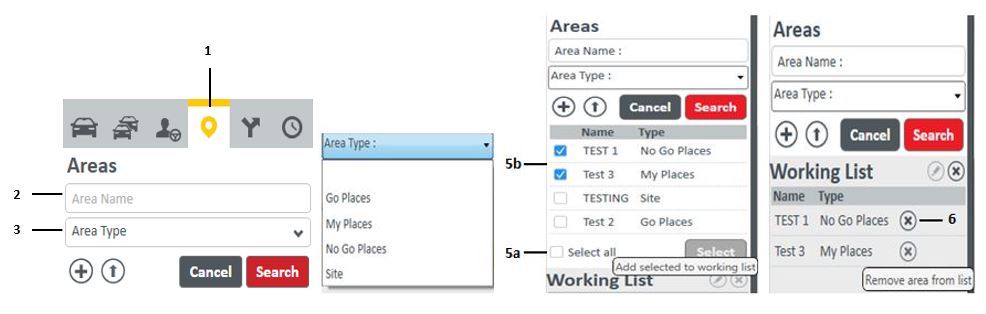
Search: 1. "Click" the Areas tab to open the Areas side bar. 2. Enter the Areas Name into the field. 3. Select from the drop-down box the Area Type. 4. Activate the Search icon. Empower will perform a search and retrieve the Area information from the Tracker database and display it. 5. The user has two options to transfer the Area to the Working List: a. A Select All tick-box selects all the available or, b. Individual Areas can be picked from the list by "ticking" the relevant box next to the Area Name. 6. After the selection, the user activates the Add selected to working list icon. Only the selected Areas will be transferred to the Working List. 7. To delete an Area from the Working List, move the mouse pointer over the delete icon. You will be prompted with Remove Area from list. "Click to remove the Area. |
||
|
|
|||
|
|
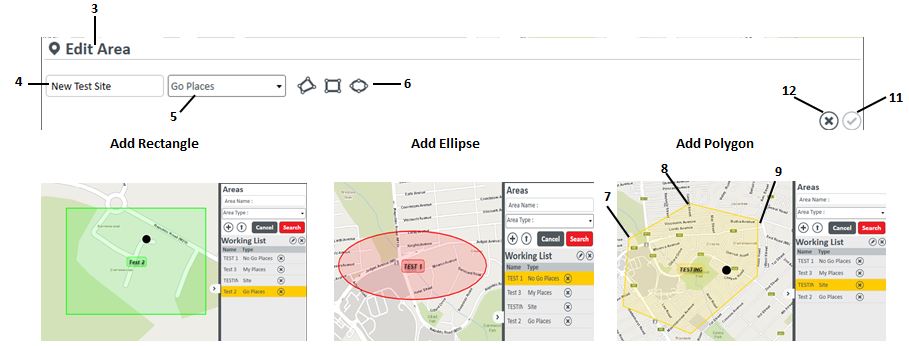
Create New Area: This icon allows the user to create a new area. 1. "Click" the Map tab and navigate to the required area where the area needs to be created. 2. Zoom to the required level of detail. 3. Activate the Create new Area icon to open the Edit Area window. 4. Enter the area Name into the field 5. Select from the drop-down list Type of area. (Go Places, My Places, No Go Places or Site). 6. Select the type of polygon to mark the area. 7. Place the mouse pointer at left top side of the area. Left "Click" on mouse button and hold. 8. Gradually drag the pointer to the right side of area. "Click" once and hold mouse button "in". 9. Repeat for right below, left below and back to start point (7). 10. Double "click" to exit from area marking. Note: Similar actions are performed to mark areas using the ellipse or polygon. 11. "Click" the Save icon to save the newly created area. 12. To exit without saving the newly created area, click the Close icon
|
||
|
|
|||
|
|
Edit Areas: This icon allows the user to edit existing areas.
|
||
|
|
|||
|
|
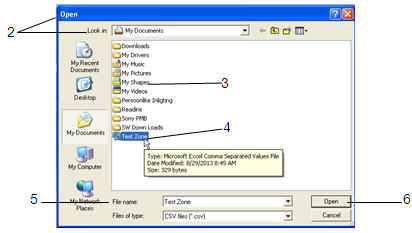
Import Areas from CSV files: This icon allows the user to import previously saved areas with a CVS file extension. 1. "Click" the Import Areas from CSV files icon. 2. The windows Open window is displayed with the My Documents dropdown box. 3. Search for the folder where a previously saved CSV file extension is. 4. Select the CSV file. 5. The selected CSV file name will be listed in the File name field. 6. "Click" Open button to display the imported area on the map. |
||
|
|
|||
|
|
Clear search fields: Activating this icon, clears both the Area Name and Area Type search fields. |
||