|
3.3.1.2 Groups
|
 
|
|
3.3.1.2 Groups
|
|
3.3.1.2
Groups
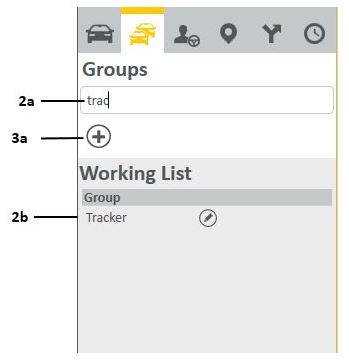
"Click"
on the Groups tab to open the Groups Side Bar. The following pre-requisites are
essential:
· The vehicle should be registered to a Group.
· Applicable Areas needs to be registered (Areas tab. (Refer to Section 3.5 ).
·
A driver working hours needs to be registered. (Working Times tab. (Refer
to Section 3.6)
Using the Group function, the user can link a vehicle to driver (using the Working Time tab) and restrict the driver to certain areas (using the Areas tab).
|
1. When the Groups tab is
selected, all created Groups will 2. To filter for a specific
Group in the Working List, start typing the
3. To create a new Group the following steps apply:
b. The Group Manager window opens to register a new Group. c. Enter the Name of the new group into the field. d. From the
Link Working Time drop-down box, select the e. Select the
group icon from the Icon: Default Symbol to uniquely f. From
the colour chart, click the drip down box and select the g. To register the group select the Save icon. h. To cancel
the Add new Group registration process, select the i. To delete the group, select the Delete icon.
4. Added to an existing
Group. (Refer to the
Edit Group Section
|
|
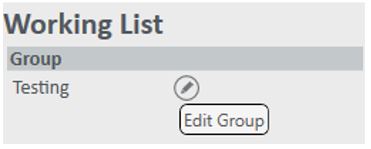
Note: Once your Group has been created, select the Edit Group option, to link Vehicles, Areas and Drivers to the Group. |
|
|
|
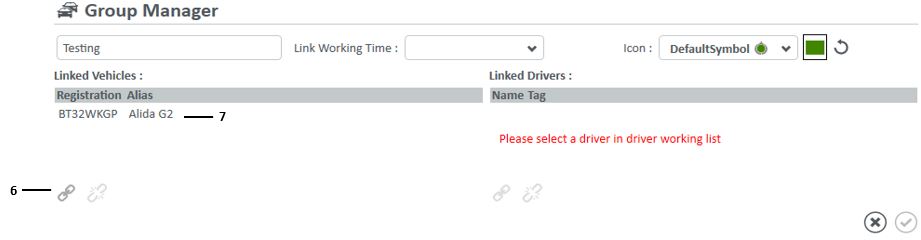
Edit a Group : This icon allows the user to link/unlink Vehicles and Drivers
to/from a Group or completely delete a group. Note : The same procedure is followed to link/unlink a Vehicle or Driver from/to a Group. 1. Search for the Group that needs editing and transfer it to the Working List. 2. Select the Edit Group icon. 3. The Group Manager window opens and displays: a. The group Name, the current Link Working Time, allocated group icon (Icon: Default Symbol) and Colour selected to display information. b. Linked Vehicles and Linked Drivers respectively. 4. To link a Vehicle or Driver to a Group, perform a separate search and transfer it to the Working List. 5. Select the required Vehicle or Driver in the Working List. 6. The respective Link icon will come active on the Group Manager window. 7. Click the respective Link icon to add a Vehicle or Driver to the group. Make sure the added item appears in the respective list. 8. To unlink a Vehicle or Driver, select the respective item on the linked table. The Unlink icon becomes active. Select the Unlink icon. Make sure the selected item disappears from the list. 9. To save the changes, "click" the Save icon. 10. To close the Group Manager window without saving the changes, "click" the Close icon. 11. To delete the Group, select the Delete icon. |
|
|
|